Updated Apr 13, 2023
Goal: To introduce and practice the basic concepts of yoga
Crafts:
Relaxation Pillow
Aromatherapy Spritzer
Activity:
Yoga
Note: Make sure your group knows ahead of time to wear comfortable, stretchy athletic clothing for the meeting.
Enjoy your unit’s usual opening and explain to the group that they are going to become yogis/ yoginis tonight! Ask your group what they know about yoga. Is it a new invention? Can it be for everyone, or do you have to be as flexible enough to twist yourself into a pretzel? Has anyone tried it before?
Answers: Yoga is exercise, breathing and relaxation all in one. It is not a religion, a diet or a competitive sport. A male who does yoga is called a yogi, while a female who practices yoga is called a yogini. Yoga began over 5,000 years ago in India and has been passed down through generations and across continents to us today. Everyone can do yoga! All you need is some empty space to put a mat and your own body (non-restrictive clothes and bare feet are suggested). No special equipment or skills are required. Doing yoga poses improves your awareness of your body, and practising relaxation and breathing improves your awareness of you mind and spirit.
The aroma of lavender is known for both its relaxing and its invigorating properties, making it useful for calming nerves, as well as encouraging feelings of increased energy and mental clarity. This craft can be placed over your eyes or on your forehead anytime you need to relax.
1. Measure and cut two 5-by-8-inch pieces from the linen with sewing scissors.
2. Match edges with right sides together and pin. (The right side of the fabric is whatever side you want to show on the outside of the finished pillow.)
3. Using a tight back stitch, sew around the perimeter, about a 1/4 of an inch from the edge, leaving a 4-inch opening along one side.
4. Snip the corners of the seam allowance on a diagonal, being careful not to cut into the seam. This will help your corners be flatter when you turn the pillow case right side out.
5. Now, carefully turn your pillow case right-side-out. You can use a pen or pencil to gently push out the corners.
6. Fill with lavender. (If using rice or flax seeds instead, pour 3 -4 drops of lavender essential oil in as well.)
7. Hand-stitch opening closed with a simple slip stitch.
Note: Do not heat in the microwave.
Mood mists are simple to make and enjoy. Spray in the air or on linens to leave a light scent. (They won't stain.) Lavender and bergamot are relaxing and centering.
1. Fill a clean, dry mini spray bottle with 4 ounces of pure distilled water.
2. Carefully pour a few droplets of the essential oil(s) directly into the spray bottle (Either 5 drops of lavender, or 2 bergamot and 3 lavender).
3. Tightly close the bottle and shake vigorously to combine. Be sure to shake it before each use, as the water and essential oils tend to separate.
Many people who practice yoga find that it releases their tension and improves their mood. Being a teenager can be stressful sometimes. Life is busy with family, friends, school, extracurricular activities and maybe even part-time jobs. Ask your group to name some everyday pressures they experience and then share their favourite ways of dealing with them. In addition to yoga, what are some good ways of making stress melt away?
To avoid injury, it is important to have warm muscles before stretching. Lead the group in a few minutes of simple activities such as marching in place, dancing, arm circles, shoulder rotations, neck rolls, ankle rolls, lunges, jumping jacks, etc.
On average, humans breathe approximately 26,000 times a day! We don’t have to think to breathe; it is something that our bodies do for us automatically. Yoga encourages us to pay more attention to our breath, rather than taking it for granted. Breath gives us oxygen and life!
Direct your group to sit on their mats in crossed-legged positions with their head, neck and back in line, or in a chair if more comfortable. Ask everyone to just breathe through their noses with their mouths closed and to simply observe their breath for a few moments. Breathe through the nose with the mouth closed. Notice how the breath feels as it goes into the body. If there are any tight spots, imagine the breath going into those spots and loosening them. Now, start to lengthen your breath, if you can. See how long you can make each inhalation and exhalation last for. This is it slowing your breath down and relishing it, not holding it!
Continue for another minute then transition to the next activity.
Now it’s time to try out some yoga postures. These are only a sampling of a few of the many yoga positions that exist. It is best to have bare feet to reduce the risk of slipping. Move gradually and never do anything that is painful. Suggest to your group that they visualize the animal or form each pose is named after, to make them easier. Narrate the following descriptions slowly:
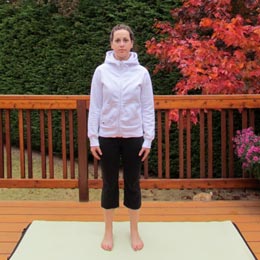
Become a yogi or yogini by trying out the basic starting position: Mountain Pose.
Begin by standing tall and straight at the top of your mat with your feet separated hip-width apart. Arms dangle comfortably by your sides. Keep your hands uncurled and relax as you roll your shoulders slightly back. Stand steady as a mountain as you slowly breathe in and out. Feel as if your feet are fixed to the ground, while your body towers upwards to the sky like a mountain. Enjoy your breath as it nourishes your body.
Now lift your left foot off the floor completely, bend your left knee out to the side and place your foot above the knee on the inside of your right leg. To make balancing easier, find something ahead of you to fix your gaze on.
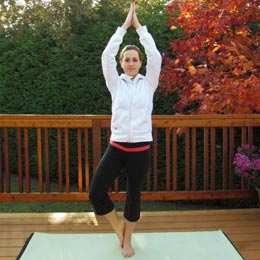
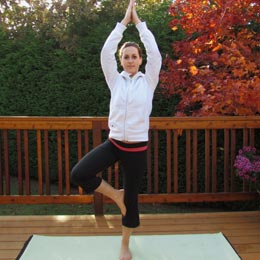
Become a yogi or yogini by trying out the Tree Pose. Step 1: bring your hands together at the middle of your chest, palms together at the level of your heart. Your elbows point down. Now straighten your arms above your head palms still touching, like the top of a pointy pine tree. Lift your left foot off the floor and brace it against your ankle.
From Mountain Pose, shift your weight on to your right leg. Place your left foot against your right ankle, with your big toe balancing on the ground. Optional: If you feel like even more of a challenge, lift your left foot off the floor completely, bend your left knee out to the side and place your foot above the knee on the inside of your right leg. To make balancing easier, find something ahead of you to fix your gaze on. Bring your hands together at the middle of your chest, palms together at the level of your heart. Your elbows point down. Now, straighten your arms above your head, palms still touching, like the top of a pointy pine tree. Breathe slowly in and out. Release back to mountain pose.
Shift your weight on to your left leg. Place your right foot against your left ankle, with your big toe balancing on the ground. Optional: If you feel like even more of a challenge, lift your right foot off the floor completely, bend your right knee out to the side and place your foot above the knee on the inside of your left leg. Bring your hands together at the middle of your chest, palms together at the level of your heart. Your elbows point down. Now, straighten your arms above your head, palms still touching, like the top of a pointy pine tree. Breathe slowly in and out. When you’re ready, release back to Mountain Pose.
Become a yogi or yogini by trying out the Warrior Pose. Learn how to stand strong like a warrior.
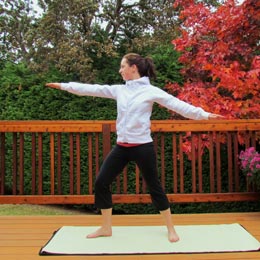
Beginning in Mountain Pose, step forward with your right leg, bend your right knee to a 90 degree angle (or slightly less) and point your foot forward. Make sure your ankle is in front of your knee to protect it. Keep your left leg straight behind you and turn your left foot in towards your right foot. Place your hands onto your hips and make sure your hips and ribs are in an even line on both sides of your body- you may need to adjust your stance to fix this. Lift your arms up to shoulder height and rotate them outward, with your inner elbows facing upwards. Twist your wrists so the palms of your hands face down. Your right arm should reach over your right leg and your left arm should be behind you, over top of your left leg. Turn your head to look forwards toward your right hand. Maintain a long, tall spine. Breathe steadily here for a few moments, then release back to Mountain Pose.
Step forward with your left leg, bend your left knee to a 90 degree angle (or a little less) and point your foot forward. Make sure your ankle is in front of your knee to protect it. Keep your right leg straight behind you and turn your right foot in slightly so that it points towards your left foot. Place your hands onto your hips and make sure your hips and ribs are in an even line on both sides of your body- you may need to adjust your stance to fix this. When you are properly aligned, lift your arms up to shoulder height and rotate them outward, with your inner elbows facing upwards. Now, twist your wrists so the palms of your hands face down. Your left arm should reach over your left leg and your right arm should be behind you, over top of your right leg. Turn your head to look toward your left hand. Maintain a long, tall spine. Breathe steadily here for a few moments, then release back to Mountain Pose.
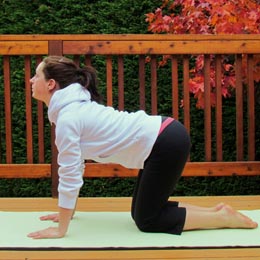
Become a yogi or yogini by trying out the Cat Pose. Step 1: Imagine yourself as a stretching cat. Come onto your hands and knees with your hands just forward of your shoulders and knees under your hips. Breathe in and arch your back towards the floor, with your chest forward and tailbone reaching up to the ceiling so that your back is dropped in a curve.

Step 2: Look up. As you breathe out, curve your back in the opposite direction. Drop your head and look down as your back rounds and tuck your tailbone under. Repeat once more.
Come onto your hands and knees with your hands just forward of your shoulders and knees under your hips. Breathe in and arch your back upward, with your chest forward and tailbone reaching up to the ceiling so that your back is dropped in a curve. Look up. As you breathe out, curve your back in the opposite direction. Drop your head and look down as your back rounds and tuck your tailbone under. Repeat once or twice more.
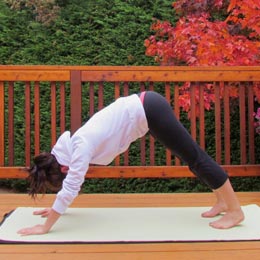
Become a yogi or yogini by trying out the Downward Facing Dog Pose. Visualize a dog stretching and reaching its front paws out.
Since this pose is a forward bending pose, be careful to move slowly so that your head doesn’t feel dizzy. Begin on your hands and knees. Have your knees and feet body width apart and spread your fingers wide. Tuck your toes under and lift up, straightening your legs as much as possible, so that you are in an upside down “V” position. Push your tailbone up toward the ceiling as you try to gently stretch your heels towards the ground. Don’t worry if they don’t quite touch; being on tip toes is OK too. Press into the ground with your hands, and let your head and neck relax and hang down between your shoulders. Hold for a few breaths and then lower yourself back to the starting position.
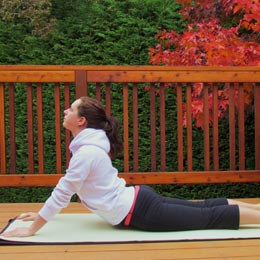
Become a yogi or yogini by trying out the Cobra Pose. Imagine yourself as flexible as a snake.
Lie down on your stomach with your forehead touching the floor and your legs together and straight out behind you. Place your elbows, forearms and palms on the floor, just under your shoulders. Push into the ground with your elbows, arms and hands as you slowly raise your head and shoulders off the ground. Breathe in and out. Now, continue pushing up until your chest is completely off the floor and your arms are as straight as possible. Keep your elbows close to your ribs. Slide your shoulder blades down away from your ears towards your hips. Look up at the ceiling. Hold for a few more breaths and then slowly lower back down to the starting posture.

Become a yogi or yogini by trying out the Seated Spinal Twist Pose.
With your legs out in front of you, sit as tall and as straight as you can. Move your right foot over your left leg, placing it flat on the floor beside your left thigh or knee. Bring your right arm back, and place your right hand on the floor behind you for support. Hug your right knee with your left arm. Breathe in. As you breathe out, rotate your upper body to the right, but keep your hips facing the front. Turn your head and neck gently to look over your right shoulder. Stay here for a few moments. Try to sit up taller and twist around farther with each breath. Slowly turn back to centre and un-cross your right leg. Repeat the twist in the opposite direction to balance out your spine.
With your legs out in front of you, sit as tall and as straight as you can. Move your left foot over your right leg, placing it flat on the floor beside your right thigh or knee. Bring your left arm back, and place your left hand on the floor behind you for support. Hug your left knee with your right arm. Breathe in. As you breathe out, rotate your upper body to the left, but keep your hips facing the front. Turn your head and neck gently to look over your left shoulder. Stay here for a few moments. Try to sit up taller and twist around farther with each breath. After a few moments, slowly turn back to centre and un-cross your left leg.

Become a yogi or yogini by trying out the Bridge Pose.
Begin by lying on your back, with your knees bent and your feet flat on the floor, hip-width apart. Your arms stay naturally along your sides, palms facing down. Press your shoulders, hands and feet into the floor as you lift your hips up off your mat. Your chest moves towards your chin as your tailbone moves towards your knees. Hold for a few breaths then slowly come down to rest. Repeat twice more. To conclude, return to a seated position on your mat.
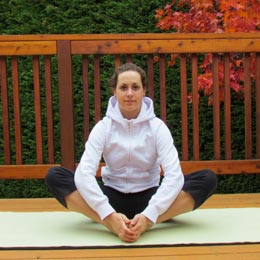
Become a yogi or yogini by trying out the Cobbler's Pose.
Begin by sitting on your mat. Bring the soles of your feet together and draw your heels in toward you as your knees move away from each other. Clasp your hands over your feet and rest your elbows on your calves or on the inside of your knees. Keep your spine straight and lean forward into the inner thigh stretch. Try to deepen the pose gently on each exhale. Breathe evenly here for a few moments before returning to a normal seated position.
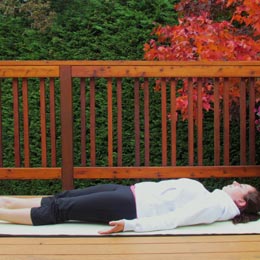
Become a yogi or yogini by trying out the Corpse Pose. It's easy!
Lie on your back with your legs stretched out and slightly apart and your arms comfortably at your sides. Let your shoulders melt away from your ears. Allow your palms to face up and open. Close your eyes. Optional: You may want to cover your eyes with your lavender eye pillow. Let go of your concerns and your responsibilities. Clear your mind and focus only on your breath. Spend at least five minutes here. You’ve worked hard in your yoga practice today. This is the pose that helps your body to absorb that work and let it all sink in before you return to your everyday life.
Imagine that the curve of your back is the domed shell of a tortoise. Begin in a kneeling position and then drop your hips so that you are sitting back on the heels of your feet. Lower your forehead to rest on the mat. Stretch your arms out in front of you, palms facing flat down. Feel the weight of your body resting on your legs. Breathe and relax for as long as is comfortable.
Option One: Yogurt, fruit and granola.
Option Two: If there is a kitchen available, make healthy berry smoothies.
Ingredients:
2 cups (500 ml) frozen berries
1 cup (250 ml) plain yogurt
2 Tbsp. (30 ml) liquid honey
½ cup (125 ml) milk or orange juice
Directions:
1. Place the frozen berries, yogurt and honey in a blender.
2. Pour the milk or orange juice in the blender and blend until the mix reaches a smooth consistency.
3. Enjoy!
Makes 4 cups (1 L)
Congratulate the group on being open minded and trying new and healthy things!
Enjoy your regular Closing.

This Meeting Plan was researched and written by our intern Vanessa Day.