Holiday Plates Craft

Updated Apr 02, 2023

Santa Plate

Materials Required:

  • Red Paper Plates (or white plates painted red)
  • Cotton Balls
  • White or Peach or Brown Construction Paper
  • Black Construction Paper
  • Red Construction Paper
  • Scissors
  • White Glue

Instructions:

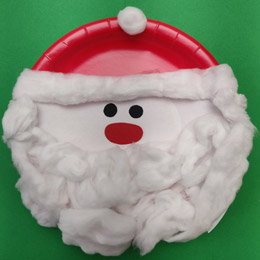
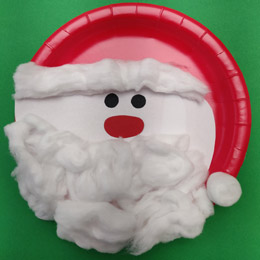
There are two versions of this craft, one with Santa's hat curving to the side and the other with the pom-pom on top. The steps to make them are nearly identical. Also, if you would prefer, the construction paper can be replaced by paint.

  1. First take your red plate and decide on a Santa design.
  2. Unravel a bunch of cotton balls.
  3. Take your longest unraveled cotton ball (or multiple if needed) and stretch it across the plate to form the trim for the hat. If you're going for Santa's hat curving to the side, only stretch the cotton ¾ of the way across the plate. Don't glue it down yet.
  4. Use your white, peach, or brown construction paper as the base for Santa's skin. If you're making Santa's hat curving to the side, make sure to round Santa's right cheek with the inner curve of the plate.
  5. Remove the hat trim, glue down the skin tone, and then glue the hat trim in place.
  6. Cut out two round eyes from the black construction paper and an oval nose from the red construction paper; glue them in place.
  7. Cut up the rest of the unraveled cotton balls and glue them onto the plate to form Santa's beard. For the curving Santa hat, make sure the unraveled cotton doesn't get onto the red hat.
  8. Finish Santa's hat off with a cotton ball pom-pom on top or at the bottom of the curve for Santa's side hat.

Snowflake Plate

Materials Required:

  • White Plates
  • Pencil
  • White Glue
  • Glitter or paint
  • Hole Punch
  • String

Instructions:

  1. With the pencil, draw your snowflake design lightly onto a white plate.
  2. Once you are satisfied with the design, take the white glue and trace your picture. Make sure to leave thick glue lines that stand out from the plate.
  3. If you're using glitter, spread the colour over the glue while it is still wet. Let the glue dry and brush the excess away.
  4. If you're using paint, wait for the glue to dry and then paint it the colours you want.
  5. Once your snowflake is finished and dry, punch a hole through the top rim of your plate. Tie a string through the hole and hang your craft where everyone can see.

Snow Person Plate

Materials Required:

  • White Plates
  • Black Construction Paper
  • Orange Construction Paper
  • Brown Construction Paper
  • Coloured Construction Paper
  • Extra Large Coloured Construction Paper
  • Cotton Balls
  • White Glue
  • Scissors

Instructions:

  1. Take the extra-large coloured construction paper, we used blue, and lay it flat to create the background.
  2. Position two white paper plates to form the body and head of the snow person. Cut the outer rim of the head plate off to make the it slightly smaller than the body. Glue the plates in place.
  3. Cut out the hat, eyes, mouth, and buttons out of the black construction paper and glue it in place. The hat stands a bit off the background to give it a 3D look, but if you want you can place cotton balls behind the hat to hold it up.
  4. Grab the orange construction paper to cut out a carrot-shaped nose. Glue it down.
  5. Use the regular sized coloured construction paper to make a ribbon for the snow person's hat. Make sure to glue it.
  6. Cut out your snow person's arms using the brown construction paper. Once you have them positioned just right add glue to hold them in place.
  7. Decorate your background with cotton balls to make falling snow.

Christmas Tree Plate

Materials Required:

  • Green Plates
  • Various Colours of Construction Paper
  • Scissors
  • Hole Punch
  • Fishing Line or String
  • White Glue

Instructions:

  1. Using the green plate, take the scissors and cut it in a corkscrew pattern, curving gently towards the center of the plate. You know that you've done it right when you can pick up the center of the plate and the rest drops away to form a spiraling tree.
  2. Punch a small hole in the top of the tree. String through the fishing line or thread and tie in a knot to form the hanger.
  3. Now let's decorate this Christmas tree! Cut out shapes from the various colours of construction paper. These will be your ornaments. You can decorate them as you wish or leave them plain.
  4. Use the hole punch and string to create hangers for each ornament, but don't tie the string tight just yet.
  5. Punch another hole into the Christmas tree wherever you want the ornament to hang from. Thread the ornament string through this hole and then tie it into a knot. When released your ornament should dangle from the tree.
  6. Cut out a star for the top of the tree and glue it into place. You now have a decorated Christmas tree to hang in your house!

Other Holiday Plate Ideas

  • Colourful Tissue Ball Ornament
  • Reindeer Plate
  • Cut Out Center Christmas Wreath
  • Rolled Plate Christmas Tree
  • Two Plate Peppermint Candy
  • Two Plate and Stick Lollypop
  • Wreath and Inner Candle Plate

Pauline Woodhouse

As a third-generation Scouter, Pauline is a writer passionate about giving back to the Guiding and Scouting programs. She grew up making beaver buggies with the boys, selling popcorn as a Cub and practicing outdoor skills with the Scouts. Instead of moving on to Ventures, she became an assistant leader for Cubs, also known as a Kim. Pauline is proud to pass on her Scouting knowledge to an international audience.


  • Share:
@2024 E-Patches & Crests is a private enterprise not affiliated with Girl Guides of Canada.
This site is not sponsored, endorsed or approved by Girl Guides of Canada or any Provincial Council.
Checkout

Total 0