DIY Christmas Gift Ideas

Updated Apr 02, 2023

Santa’s Sleigh

Materials Required:

  • Candy canes
  • Regular sized square chocolate bar
  • Small sized chocolate bars
  • Tiny decorative chocolate bars
  • Santa decoration (We used a chocolate Santa)
  • Double sided tape
  • Christmas ribbon
  • Scissors

Instructions:

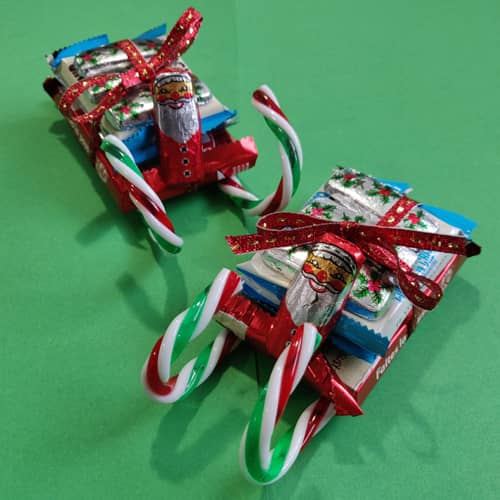
Before you begin, make sure you preplan how you want your sleigh to look. Stack up the chocolate bars to get a good visual and start.

  1. Place two candy canes on a flat surface with the curl of the cane sticking up to form the runners of the sleigh.
  2. Place double sided tape down the top of the long part of the candy canes.
  3. Stick your regular size square chocolate bar onto the candy canes to form the base of the sleigh and the runners.
  4. Put double sided tape on the top of the regular sized chocolate bar and stick your small sized bars on top. This will give the sleigh some height. You can stack as many layers as you wish to make the sleigh taller. We found that two layers was perfect.
  5. Add some more double sided tape to the top layer and stick your tiny decorative chocolate on top. We used a holly wrapped chocolate, but you can put any edible decoration you want to make the sleigh that much more magical.
  6. Once you have constructed your sleigh, tie all the chocolates together with a ribbon.
  7. Take your Santa decoration and set him on the sleigh. Our Santa needed a little bit of double sided tape to stay put.
  8. Now Santa’s sleigh is complete and ready to be gifted!

Rudolph Hot Chocolate

Materials Required:

  • Unmarked piping bags
  • Pipe cleaners, brown
  • Pompoms, red
  • Googly eyes
  • Clear glue
  • Hot chocolate powder
  • Mini chocolate chips
  • Small marshmallows
  • Christmas ribbon
  • Scissors

Instructions:

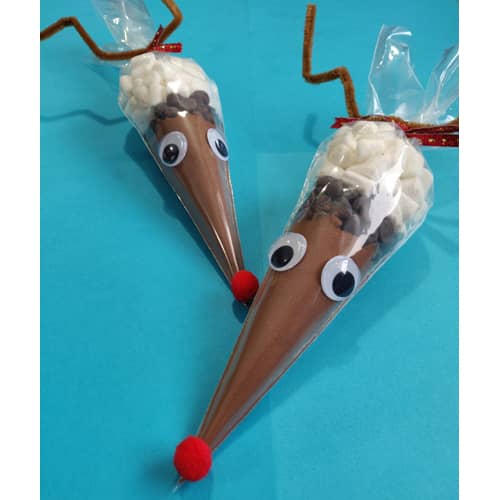
This DIY craft makes one cup of hot chocolate mix that you are to pour into a mug of hot water. Please adjust the ingredients to your tastes.

  1. Start creating your Rudolph by putting three tablespoons (or however much your brand of coco recommends for a cup) of hot chocolate powder into an unmarked piping bag. Make sure the powder gets all the way down.
  2. Add a layer of mini chocolate chips to the piping bag.
  3. Add a layer of marshmallows.
  4. Twist the piping bag closed and tie it with the Christmas ribbon.
  5. Twist the center of the brown pipe cleaner around the closed end of the piping bag once and then bund the rest of the pipe into Rudolph’s horns.
  6. Use the glue to stick on Rudolph’s eyes and nose.
  7. Let the glue dry and Rudolph will be set to fly onto his new home.

Present Treat

Materials Required:

  • Small rectangular box
  • Wrapping paper
  • Christmas ribbon
  • Scissors
  • Tape
  • A treat of your choice

Instructions:

  1. Place your tasty Christmas treat inside the small box and tape it closed.
  2. Take your scissors and cut out an appropriately sized section of wrapping paper.
  3. Wrap your present. Take your time and try to make your edges crisp and straight. If you can, try to tape near the edges so your present looks seamless.
  4. Tie your nicely wrapped present with your Christmas ribbon to give it that extra bit of decoration. You can always substitute the ribbon for a bow.
  5. Now you have a present anyone would be proud to put under their tree, and it contains a delicious treat too!

Emoji Ornaments

Materials Required:

  • Clear Christmas balls with removable tops
  • Yellow acrylic paint
  • Markers
  • Plastic disposable cups

Instructions:

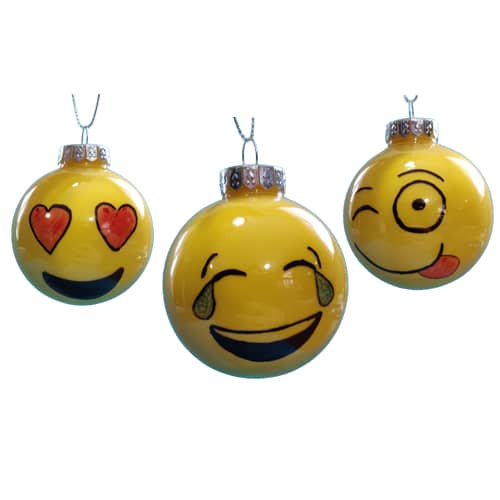
These ornaments are a great gift for anyone who loves emojis, and so simple to make. Don’t like the faces we uses? Find inspiration for your emojis with our Emoji patch category; there are over 20 to choose from!

  1. Carefully remove the top from the clear Christmas balls.
  2. Pour the yellow acrylic paint inside the ball and swirl it around until the entire inside is covered.
  3. Place the ornaments upside down in the plastic disposable cups to let all the extra paint run out.
  4. Let the paint dry.
  5. Place the top back on the Christmas balls.
  6. Take your marker and draw your emoji’s face. It’s that easy!
  7. Give the emoji ornaments to a loved one and watch their face light up!

Sock Snowman

Materials Required:

  1. White sock
  2. Sock in color for the hat
  3. Rice
  4. Rubber bands (or thread)
  5. Buttons
  6. Ribbon
  7. Orange pom poms
  8. Glue gun
  9. Markers or paint

Instructions:

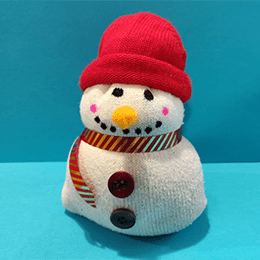
Grab your old socks, leftover crafting supplies, and heat up that glue gun because it’s time to create the cutest snowman around! This adorable craft is easy to make and kids just love the bean bag feel that the rice creates. This snowman makes a great winter decoration, a quick stocking stuffer, or a great DIY gift for a friend.

  1. Fill the white sock with rice. The easiest way to do this is to take a tall cup, fill it with rice, then put the sock over the cup and invert. This method really reduced the amount of rice that was spilled. We were surprised with how much rice a sock can hold, so make sure you have a lot on hand. Also, make sure that you’re generous with the rice. We were a bit shy and you can see how the top of our snowman’s head sunk in a bit.
  2. Once you have got your snowman to the size you want, just tie off the top of the sock with a rubber band. You can cut off the excess sock or tuck it into the hat later.
  3. Wrap a second rubber band in the middle of the snowman to make the head.
  4. Grab two or three buttons, depending on the size of your snowman. Attach the buttons with a bead of glue. Be careful of the hot glue.
  5. Take your orange pom pom and trim it in the shape of a carrot nose and glue on. Taking two small orange pom poms, gluing them together, and rolling them into work as well.
  6. Using a marker, draw on the mouth, eyes, and any other face decorating.
  7. Next, use a bit of Christmas wrapping ribbon to make a scarf. Glue in place with a bead or two of hot glue.
  8. Finally, cut the toe or heel part out of a coloured sock for the hat. Roll edge up to create the brim and glue in place. If you have any extra sock at the top, make sure you tuck it into the hat before you glue it down.
  9. Now your snowman is ready!

Sock Santa

Materials Required:

  • Beige sock
  • Fluffy red sock(s)
  • Rice
  • Rubber bands
  • Cotton wool
  • Red pom pom
  • Black pomp oms (optional)
  • Googly eyes
  • Hot glue gun

Instructions:

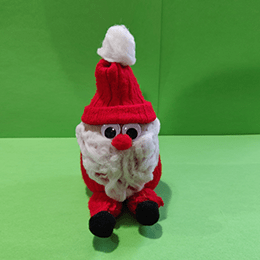
This adorable little Santa has checked his list twice and can’t wait to be brought to his new home. Before you start working on this craft, decide if you want your Santa to have a fuzzy winter jacket and hat or just a normal one. Our Santa was made with a normal red sock, but you can substitute a fluffy sock instead. Also, we created our Santa with legs, but you can easily skip that step and have a round bottom Santa just like the snowman.

  1. Start off by filling a beige sock with rice. The easiest way to do this is to take a tall cup, fill it with rice, then put the sock over the cup and invert. This method really reduced the amount of rice that was spilled. We were surprised with how much rice a sock can hold, so make sure you have a lot on hand.
  2. Once you have got your snowman to the size you want, just tie off the top of the sock with a rubber band. You can cut off the excess sock or tuck it into the hat later.
  3. Tie a second rubber band about a third of the way down the sock to make Santa’s head.
  4. Place your Santa into the ankle of the red sock to “dress” him.
  5. You can trim the sock and glue in place for a round bottom Santa or you can leave some extra sock to make legs. If you don’t want your Santa to have legs, jump to step 12.
  6. Cut the extra attached sock piece vertically up the middle to divide it into two legs.
  7. For each leg, glue the sock together length-wise to create a tube.
  8. Tie rubber bands around the upper portion of each leg.
  9. Fill the legs with rice and close them with another rubber band.
  10. Roll any excess sock up to form the pant cuff.
  11. Glue black pom poms on as boots.
  12. Now that the legs are finished let’s make Santa’s face. Glue the googly eyes into place and attach the red pom pom for the nose.
  13. Spread out the cotton and cut or pull it into a beard shape. Glue the beard into place.
  14. Next, we’ll make the hat. Cut a rectangular tube section out of the remainder of the red.
  15. Roll the bottom edge up to create the hat brim and tie the opposite end with a rubber band.
  16. Attach a white pom pom or cotton wool to cover the tied portion of the hat. This will give Santa his signature look.
  17. Glue the hat in place and your Santa is ready for his new home.

Sock Gnome

Materials Required:

  • Grey sock
  • Rice
  • Rubber bands
  • White pom pom
  • Beige pom pom
  • Faux fur/yarn/material
  • Grey felt
  • Hot glue gun

Instructions:

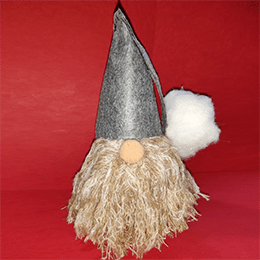
This adorable gnome has snuck out of the garden to personally brighten up your holiday season. With his large hat and fluffy beard, he’s sure to make the perfect DIY gift. You can even go a step further than we did and decorate his hat with glitter, stickers, and whatever else you have laying around.

  1. Fill the grey sock with rice. The easiest way to do this is to take a tall cup, fill it with rice, then put the sock over the cup and invert. This method really reduced the amount of rice that was spilled. We were surprised with how much rice a sock can hold, so make sure you have a lot on hand.
  2. Once you have got your gnome to the size you want, just tie off the top of the sock with a rubber band. You can cut off the excess sock or tuck it into the hat later.
  3. Now it’s time to design your gnome’s beard. Depending on the material you are using you can just cut out a triangle shape and wrap the edges around your sock gnome. If you are using yarn or some other material just glue in place and trim. We recycled an old scarf and brushed out the threads to make it more beard-like.
  4. Take the beige pom pom and glue it on top of the beard for the nose.
  5. Next, let’s make the gnome’s hat. Create a cone shape out of the grey felt, making sure to size the base of the cone to your gnome’s head. Once you got the size just right, run a line of glue around your gnome and push the hat down onto it. Fold part of the cone down to make the bend of the hat and glue in place.
  6. Tie or glue a pom pom to the tip of the cone and you have finished your gnome!

Pauline Woodhouse

As a third-generation Scouter, Pauline is a writer passionate about giving back to the Guiding and Scouting programs. She grew up making beaver buggies with the boys, selling popcorn as a Cub and practicing outdoor skills with the Scouts. Instead of moving on to Ventures, she became an assistant leader for Cubs, also known as a Kim. Pauline is proud to pass on her Scouting knowledge to an international audience.


  • Share:
@2024 E-Patches & Crests is a private enterprise not affiliated with Girl Guides of Canada.
This site is not sponsored, endorsed or approved by Girl Guides of Canada or any Provincial Council.
Checkout

Total 0