Updated May 31, 2023
Goal: Learn about a different culture by creating beautiful art that comes from their country!
Crafts:
Japanese Fan
Woodblock Printing
Koinobori
Origami
Snacks:
Veggie Sushi
Onigiri
Location: A classroom, gym, or community centre room.
Preparation Time: 40 minutes.
Begin with your usual opening. Tell your group that they will be learning about Japanese culture by creating some beautiful Japanese Art and cooking some delicious Japanese snacks.
If you would like to make this a bridging activity, have the Pathfinders help a younger Spark or Ember (Brownie) group create the art and snacks.
Take a regular piece of paper and cut it into an arched “rainbow” shape, about 4 inches thick and 7 inches long. You can decorate your fan using paint or markers. How you decorate your fan is up to you. Below are some Japanese characters that you can draw on your fan.
When you finish decorating your fan, it’s time to make your fan’s handle. Take 4 Popsicle sticks and arrange them so that they all connect at the bottom and fan out. Glue the bottoms together, and then glue the tops of the Popsicle sticks to the back of the fan. There you have your beautiful Japanese fan!
You can create a pretty wall hanging by making 3 or 4 fans, arranging them one above the other in a line, and using a ribbon to attach them along the backs.
Woodblock printing is a Japanese art where you carve a design into a block of wood and use it as a stamp to create ink and paint prints. You can make your own “woodblock” painting using a softer material—foam!
Take a foam meat tray—the kind that you find frozen meat packaged on in grocery stores. Cut off the edges of the tray and then cut the bottom of the tray into squares or rectangles of varying sizes. Be sure that the squares or rectangles are big enough for you to draw pictures on, though, because that’s your next step!
Using the tip of a pen, etch a pretty design into your foam piece. You can draw flowers or an animal or some of the Japanese characters from the previous craft…use your imagination! Your print will look best if your design fills up most of your foam shape.
NOTE: Any design that you draw will be printed on the paper in reverse, so if you want to add words to your design, make sure you write them backwards! There you have your “woodblock” stamp.
Now it’s time to print. Woodblock paintings are typically done in black, but you can use any colour you want. Using a foam paint brush or a paint roller, spread some paint onto your design. Try to not apply the paint too thickly or your design will come out blotchy on the paper. Turn your design face down and carefully press it onto the paper. Pat the back of your stamp gently—if you press down too hard, you may blot out the design. After a moment, carefully peel your stamp off the paper and take a look at your beautiful print! It may take a few tries to get the amount of paint right, but the beauty of printing is that you get to do it over and over again.
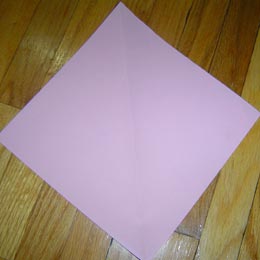
Origami is a very popular art form to this day. By folding colourful squares of paper, you can create beautiful and interesting sculptures. Origami is traditionally done using colourful squares of origami paper. If you don’t have origami paper, you can use squares of regular paper.
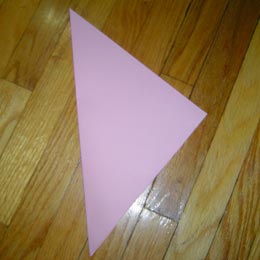
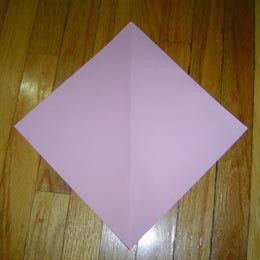
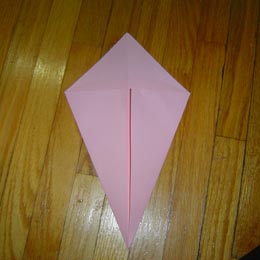
Begin with a square piece of paper. If you are using origami paper, begin with the colourful side down. Fold the paper in half, corner to corner. Fold both halves of the paper towards the centre.
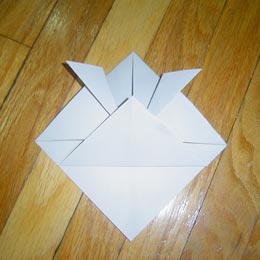
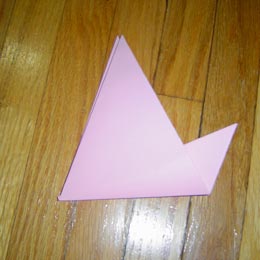
Fold the two flaps up and in half, so that they meet the top. Fold the top corners out slightly. Begin the crease at the inner bottom corners. Fold the first half of the bottom up about ¾ of the way, leaving a space between the two creases.
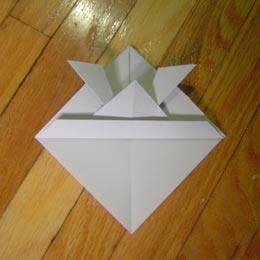
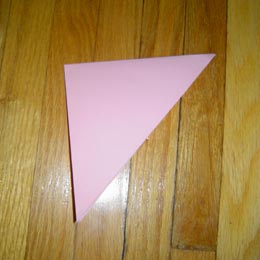
Fold up one more time so that the edges of the bottom line up with the top crease.
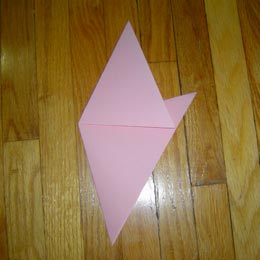
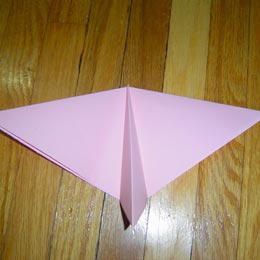
Turn the helmet over and fold up the last piece of that it is in line with the front. There you have your origami samurai helmet!
Note: If you would like to make a helmet big enough for you, all you have to do is use a bigger piece of paper! Try using newspaper, chart paper, or a big sheet of construction paper.
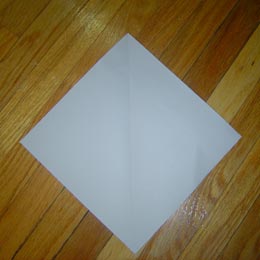
Begin with a square piece of paper.
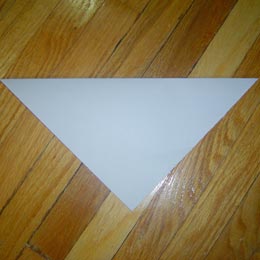
Fold the paper in half, corner to corner.
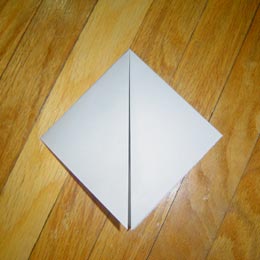
Fold both halves of the paper towards the centre.
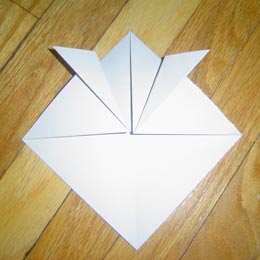
Fold the top corners out slightly. Begin the crease at the inner bottom corners.
Fold the first half of the bottom up about ¾ of the way, leaving a space between the two creases.
Fold up one more time so that the edges of the bottom line up with the top crease.
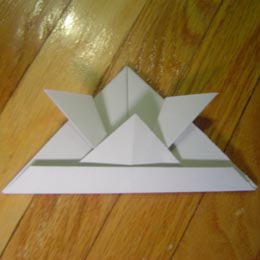
There you have your origami samurai helmet!
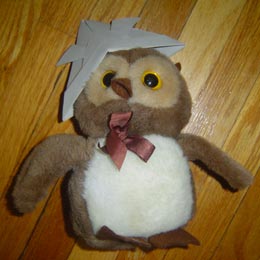
You can even turn your stuffed companion into a samurai with your hand made origami helmet.
Koinobori are kites that are made to resemble carp fish. The Japanese traditionally hang them in the wind to celebrate Children’s Day, a national holiday celebrating kids.
Take a big piece of construction paper (12”x18” would be best); this will be your carp’s body. Lengthwise, draw lines about 1 inch apart down the page, leaving a couple of inches blank at the bottom for the carp’s face.
Next, take some different coloured tissue paper and cut a bunch of little semi-circle pieces. These semi-circles are the carp’s scales. Using the lines you drew on the construction paper as a guide, glue the scales in rows along the carp, again leaving the bottom blank for the carp’s face. Make sure that the scales overlap each other and cover the underlying construction paper.
Cut a long, thin strip of black construction paper and glue it along the bottom row of scales to separate the carp’s body from its face. Cut two black construction paper circles for eyes and glue them on the blank area.
Now take some different coloured crepe paper streamers and glue them along the bottom of the carp’s body, after the first row of scales. These streamers will blow beautifully behind the kite in the wind.
To bring it all together, roll your carp kite into a cylinder and glue the ends together so that it holds. Punch a hole on either side of the carp’s face and attach a string so that you can hang your koinobori up. Watch it bob and swim around in the wind!
Origami is a very popular art form to this day. By folding colourful squares of paper, you can create beautiful and interesting sculptures. Origami is traditionally done using colourful squares of origami paper. If you don’t have origami paper, you can use squares of regular paper.
Begin with a square piece of paper. If you are using origami paper, begin with the coloured side down.
Fold the paper in half on the diagonal, corner to corner. Fold the paper in half once more, corner to corner.
Now, fold lower corner of the top layer upward so that the upper corner peaks out.
Fold the other lower corner up in the same way. Make sure that the crease is even with the crease of the first layer.
You now have your basic butterfly shape. Decorate the wings so they resemble the wing patterns of a beautiful butterfly. You can also make the butterfly flap its wings! Gently press up and down on the body and watch the butterfly’s wings flap!
Begin with a square piece of paper. If you are using origami paper, begin with the coloured side down.
Fold the paper in half on the diagonal, corner to corner.
Fold the paper in half once more, corner to corner.
Now, fold lower corner of the top layer upward so that the upper corner peaks out.
Fold the other lower corner up in the same way. Make sure that the crease is even with the crease of the first layer.
You now have your basic butterfly shape. Decorate the wings so they resemble the wing patterns of a beautiful butterfly.

Decorate with colourful designs and enjoy your new butterfly! Gently press up and down on the body and watch the butterfly’s wings flap!
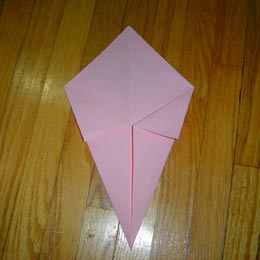
This design has two parts and requires two pieces of paper to complete. Try using one pink or red piece of paper for the flower, and one green piece of paper for the leaves.
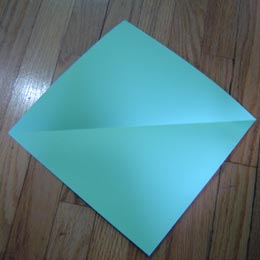
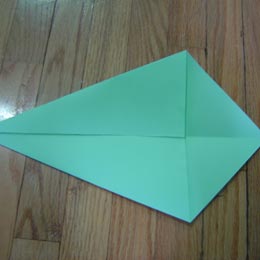
First, take the pink or red piece of paper. Fold the paper diagonally along the middle. Open the paper back up and then fold the two corners towards the centre.
Fold the corners of the front flaps down so that the sides of the folded flaps are even with the sides of the paper.
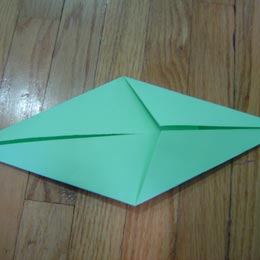
Turn the paper over and fold up the bottom so that the point is even with the point at the top of the flower.
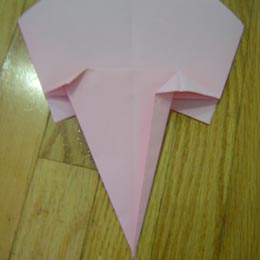
Now fold the top flap down again and fold it about a centimetre above the bottom line, making an upside down triangle.
The next part might be a little tricky. Fold the top corners of the triangle down so that they make creases. Now fold the sides of the triangle towards the crease down the middle. As you do this, the folds at the top corners of the triangle will pop up. You need to make a “squash fold.” Fold down the point at the top of the flower. Turn the paper over and there you have your rose.
Fold the paper diagonally along the middle.
Open the paper back up and then fold the two corners towards the centre.
Fold the corners of the front flaps down so that the sides of the folded flaps are even with the sides of the paper.
The next part might be a little tricky. Fold the top corners of the triangle down so that they make creases.

Now fold the sides of the triangle towards the crease down the middle. As you do this, the folds at the top corners of the triangle will pop up. You need to make a “squash fold.”

Fold down the point at the top of the flower.
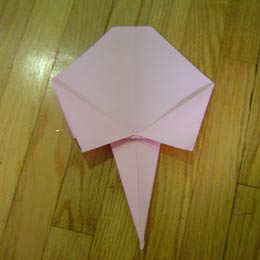
Turn the paper over and there you have your rose.
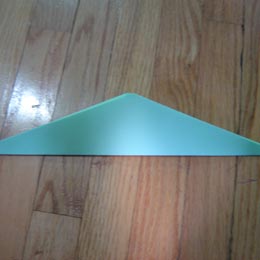
Now it is time to make the leaves for your rose. Take the green piece of paper and fold it in half diagonally so that there is a guiding line down the middle of the paper. Fold it in half diagonally so that there is a guiding line down the middle of the paper.
Fold both halves so that they line up with the middle, like you did when making the rose. Fold down the halves once more so that they are in line with the middle line. Fold the entire paper in half along the middle line.
Now fold one side of the paper up, about a centimetre from the middle. There you have your rose’s leaves.
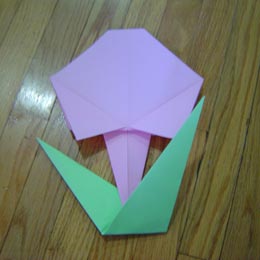
Finally, use a piece of tape to attach the rose to the leaves. Behold, a beautiful paper rose to bring a little springtime to any room!
Take the green piece of paper and fold it in half diagonally so that there is a guiding line down the middle of the paper.
Fold both halves so that they line up with the middle, like you did when making the rose.
Fold down the halves once more so that they are in line with the middle line.
Fold the entire paper in half along the middle line.

Now fold one side of the paper up, about a centimetre from the middle. There you have your rose’s leaves.
Finally, use a piece of tape to attach the rose to the leaves. Behold, a beautiful paper rose to bring a little springtime to any room!
This recipe tells you how to make 8 maki. Maki is a cylindrical sushi rolled using a bamboo mat. You can buy bamboo mats at any Japanese or Korean grocery store, as well as Whole Foods.
For little ones, it would be best to prepare and portion all the ingredients before you make this snack. Begin by precooking 1 and ½ cups sushi rice ahead of time and chilling it in a refrigerator (the rice will only stick together properly if it is cold). After the rice is nice and cool, mix in about ½ cup of sushi vinegar for flavour. Pre-chop the vegetables you want to use as filling for your sushi. Some good vegetables for making sushi are avocado, cucumber, cooked sweet potato, and carrots. The vegetable will roll best if you slice them into long, thin strips.
Roll out your bamboo mat and lay a sheet of nori (seaweed) onto the mat with the shiny side facing down. Wet your hands in some water first, and then take a handful of sushi rice. Lay the sushi rice along the bottom 1/3 of the nori and pat it down so that it stays in place. Be sure to pat the rice gently, so that it is about ¼ thick.
You can now begin laying on your veggie fillings! Try to use only 1-3 vegetable ingredients, as adding more will make the sushi more difficult to roll. Begin by placing the largest cut filling first and then adding one or two pieces of other vegetables. Remember: the fewer ingredients you use, the easier the sushi will be to roll.
Once you have carefully lain on all your ingredients, you can roll your sushi! Lift the edge of the bamboo mat closest to the rice and carefully fold it over the sushi ingredients. Begin rolling. As you roll, make sure to pull the edge of the bamboo mat out so that it does not get rolled in with the sushi. To seal the sushi roll, dip your fingers in water and moisten the furthest edge of the nori. Roll the sushi into the edge of the nori and gently squeeze the roll so that it stays together.
Cut the sushi roll into bite-sized pieces. Use a sharp knife to cut the maki into 8 even pieces. Serve your sushi with a side of soy sauce, pickled ginger, and wasabi for a more authentic experience. Enjoy your healthy and delicious Japanese snack!
Onigiri are Japanese rice balls. They are a popular snack and lunch food for kids in Japan because they are delicious and very easy to make.
Cook a pot of sticky rice. Make your rice balls while the rice is still warm so that they will keep their shape. Wet your hands and then take a handful of the rice. Onigiri are typically triangle shaped or a flattened circle, but you can make it into any shape you would like.
Onigiri taste good plain or with a filling. Some good onigiri fillings are smoked salmon, tuna and mayonnaise (canned tuna works), ground chicken or beef, and vegetables like avocado and cucumber. To stuff your onigiri, poke a hole in it and stuff the filling inside. You can also mix the filling in with the rice before you shape your onigiri so that the filling is dispersed throughout the rice ball.
To decorate your onigiri, take a strip of nori and wrap it around your rice ball. You can also break the nori up into pieces and make a design on the onigiri.
This is a traditional Japanese children’s game.
The group divides into two equal teams. The two teams hold hands in a line and stand facing each other. One player from each team plays jan-ken (meaning rock-paper-scissors) against each other. When one player wins, their group advances on the other group and sings the victory song, “Katte ureshii hanaichimonme,” which means, “We are happy to have won this round!” As they step forward, the losing team steps backwards. Then, the losing team steps forward and sings the losing song, “Makete kuyashii hanaichimonme,” which means, “We hate to lose!” As the losing team steps forward, the winning team steps backwards. The two teams then discuss amongst themselves who they want to steal from the other team. The two chosen players play jan-ken against each other, and the loser must join the other team. The children repeat the game until only one player remains on one of the teams.
A daruma doll is a wooden doll that is supposed to bring good luck. The daruma doll is the subject of this traditional children’s game.
One person is chosen as ‘It.’ The person who is ‘It’ must stand facing a wall with their eyes closed, while the other players stand a designated distance behind them. The person who is ‘It’ slowly says, “Daruma-san ga koronda,” which means, “The daruma doll fell over.” As this is being said, the other players must move quickly towards the person who is ‘It’ and try to reach them.
When ‘It’ finishes the sentence, they quickly turn around. The other players need to freeze before ‘It’ turns around. If ‘It’ catches a player moving, that player must hold hands with ‘It’ and stand facing the wall at the front.
If a player reaches ‘It’ before they finish the sentence, they must tap ‘It’ on the back. All the players then run away from ‘It.’ If ‘It’ has captured one or more players already, however, then the person who reaches ‘It’ must instead try to break ‘It’s’ hands apart from a prisoner before running away.
After ‘It’ has been tapped on the back, or after one of their prisoners has been freed, ‘It’ can turn around and yell, “Tomare!” which means, “Stop!” All the players must freeze. The person who is ‘It’ can then take up to three steps to try and reach one of the players. If ‘It’ manages to reach a player, then the player switches with them and becomes the new ‘It.’ If not, then the game restarts.
To listen to some traditional Japanese children’s songs and read the translated lyrics, go to this website: http://www.mamalisa.com/?p=528&t=ec&c=85
Have the girls share their art with one another. Enjoy your regular Closing.
http://www.activityvillage.co.uk/japanese_fan_craft.htm
http://www.thecraftyclassroom.com/CraftJapanWoodblockPrinting.html
http://www.thecraftyclassroom.com/CraftJapanCarpKite.html
http://www.origami-instructions.com/origami-samurai-helmet.html
http://www.origami-instructions.com/origami-butterfly.html
http://www.origami-instructions.com/easy-origami-rose.html
http://www.thekitchn.com/summer-project-make-vegetable-87091
http://www.c4vct.com/kym/bento/onigiri.htm
http://web-japan.org/nipponia/nipponia26/en/topic/topic01.html

This Meeting Plan was researched and written by our intern Sara McGuire.
Subtotal 0